4. Configure OpenStack
In previous sections we’ve deployed OpenStack using both Juju and MAAS. The next step is to configure OpenStack for use within a production environment.
The steps te be followed are:
- Installing a client for OpenStack Nova API (the novaclient module)
- Installing a client for OpenStack Identity API (the keystoneclient modules)
- Installing a client for OpenStack Images API (the glanceclient module)
- Installing a client for OpenStack Networking API (the neutronclient module)
- Installing a command-line client for OpenStack (the OpenStackClient - OSC)
- Setting up the environment variables
- Creating the necessary flavors
- Adding a domain, project and user
- Managing quotas
- External network access and Ubuntu cloud image deployment
Some of the procedures can be made either from the web UI (Horizon) or from the command line interface (CLI).
4.1. Installing clients for different OpenStack operations
To install the clients for OpenStack Nova API, OpenStack Identity API, OpenStack Images API, OpenStack Networking API and OpenStackClient, execute the following commands:
sudo add-apt-repository cloud-archive:rocky -y
sudo apt-get update
sudo apt-get install python-novaclient python-keystoneclient python-glanceclient python-neutronclient python-openstackclient -y
4.2. Environment variables
When accessing OpenStack from the command line, specific environment variables need to be set:
- OS_AUTH_URL
- OS_USER_DOMAIN_NAME
- OS_USERNAME
- OS_PROJECT_DOMAIN_NAME
- OS_PROJECT_NAME
- OS_PROJECT_NAME
- OS_REGION_NAME
- OS_IDENTITY_API_VERSION
- OS_AUTH_VERSION
The OS_AUTH_URL is the address of the OpenStack Keystone node for authentication. To retrieve this IP address by Juju use the following command (or as shown here):
juju status --format=yaml keystone/0 | grep public-address | awk '{print $2}'
The specific environment variables are included in a file called openrc. It is located in openstack_bundles/stable/openstack-base or you can download it. It can easily be sourced (made active).
The openrc file contains the following:
_OS_PARAMS=$(env | awk 'BEGIN {FS="="} /^OS_/ {print $1;}' | paste -sd ' ')
for param in $_OS_PARAMS; do
    if [ "$param" = "OS_AUTH_PROTOCOL" ]; then continue; fi
    if [ "$param" = "OS_CACERT" ]; then continue; fi
    unset $param
done
unset _OS_PARAMS

_keystone_unit=$(juju status keystone --format yaml | \
    awk '/units:$/ {getline; gsub(/:$/, ""); print $1}')
_keystone_ip=$(juju run --unit ${_keystone_unit} 'unit-get private-address')
_password=$(juju run --unit ${_keystone_unit} 'leader-get admin_passwd')

export OS_AUTH_URL=${OS_AUTH_PROTOCOL:-http}://${_keystone_ip}:5000/v3
export OS_USERNAME=admin
export OS_PASSWORD=${_password}
export OS_USER_DOMAIN_NAME=admin_domain
export OS_PROJECT_DOMAIN_NAME=admin_domain
export OS_PROJECT_NAME=admin
export OS_REGION_NAME=RegionOne
export OS_IDENTITY_API_VERSION=3
# Swift needs this:
export OS_AUTH_VERSION=3
# Gnocchi needs this
export OS_AUTH_TYPE=password
The environment variables can be enabled/sourced with the following command:
source openstack-bundles/stable/openstack-base/openrc
After the openrc is created, you can use OpenStack’s Horizon web UI to download the file, which automatically adjusts the environment variables. You should be loged with the given username. Right click on the user dropdown menu in the the upper right corner and select openrc -v3 from the list.
Note
If the openrc file is manually edited, it is important that all variables are correctly entered.
You can check the variables have been set correctly by seeing if your OpenStack endpoints are visible with the openstack endpoint list command. The output will look something like this:
+----------------------------------+-----------+--------------+--------------+
| ID                               | Region    | Service Name | Service Type |
+----------------------------------+-----------+--------------+--------------+
| 060d704e582b4f9cb432e9ecbf3f679e | RegionOne | cinderv2     | volumev2     |
| 269fe0ad800741c8b229a0b305d3ee23 | RegionOne | neutron      | network      |
| 3ee5114e04bb45d99f512216f15f9454 | RegionOne | swift        | object-store |
| 68bc78eb83a94ac48e5b79893d0d8870 | RegionOne | nova         | compute      |
| 59c83d8484d54b358f3e4f75a21dda01 | RegionOne | s3           | s3           |
| bebd70c3f4e84d439aa05600b539095e | RegionOne | keystone     | identity     |
| 1eb95d4141c6416c8e0d9d7a2eed534f | RegionOne | glance       | image        |
| 8bd7f4472ced40b39a5b0ecce29df3a0 | RegionOne | cinder       | volume       |
+----------------------------------+-----------+--------------+--------------+
If the endpoints aren’t visible, it’s likely your environment variables aren’t configured correctly.
Hint
As with both MAAS and Juju, most OpenStack operations can be accomplished using either the command line or a web UI.
4.3. Define an external network
To allow OpenStack network access, it is necessary to enter external network settings.
You should be logged as an user admin in the OpenStack Dashboard Horizon. To do this, you need to know the following:
- the IP address for OpenStack Dashboard
- the user credential (domain, user name and password)
Define an external network using web UI:
Using the commands shown in section “3.3. OpenStack testing” log in to the Dashboard with the following:
- Dashboard IP address: 192.168.40.145
- Domain: admin_domain
- User Name: admin
- Password: your_password
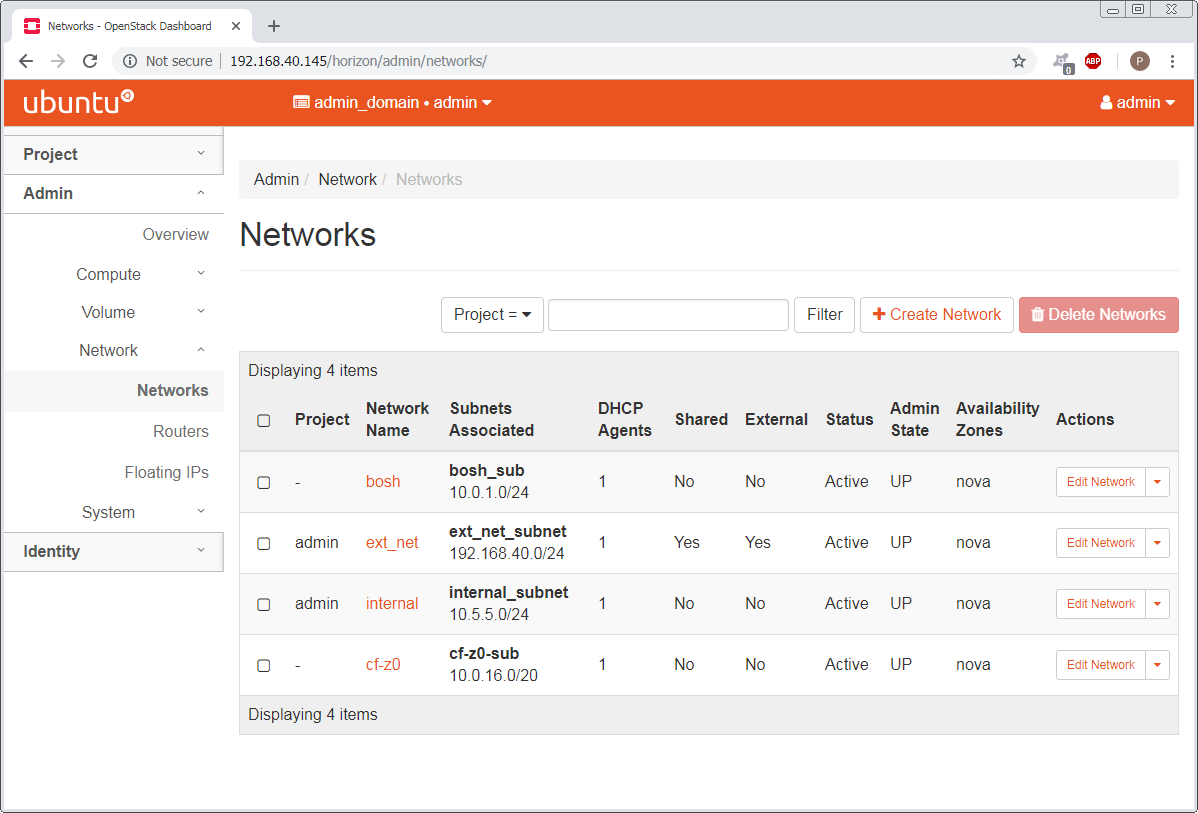
First step is to define a network called ext_net. It will use a subnet within the range of addresses reserved in MAAS.
From the panel on the left, click on Admin and choose section Network, subsection Networks. Then press the button + Create Network:
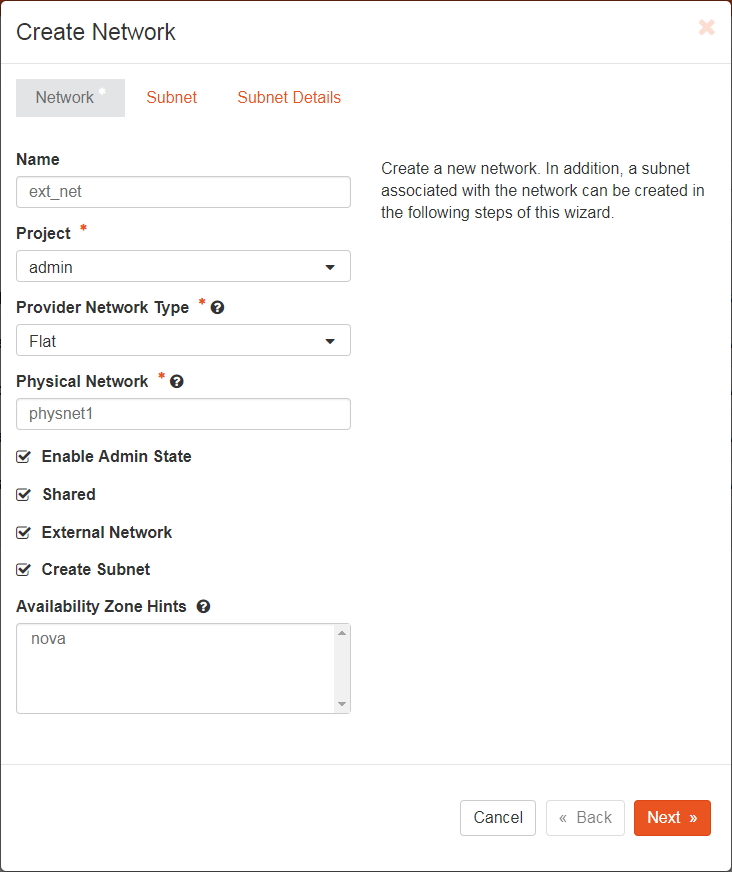
After opening the Create network window, you should enter the following settings:
- Name: ext_net
- Project: admin
- Network type: flat
- Phusical network: physnet1
- Marked checkboxes Enable Admin State, Shared, External Network and Create Subnet
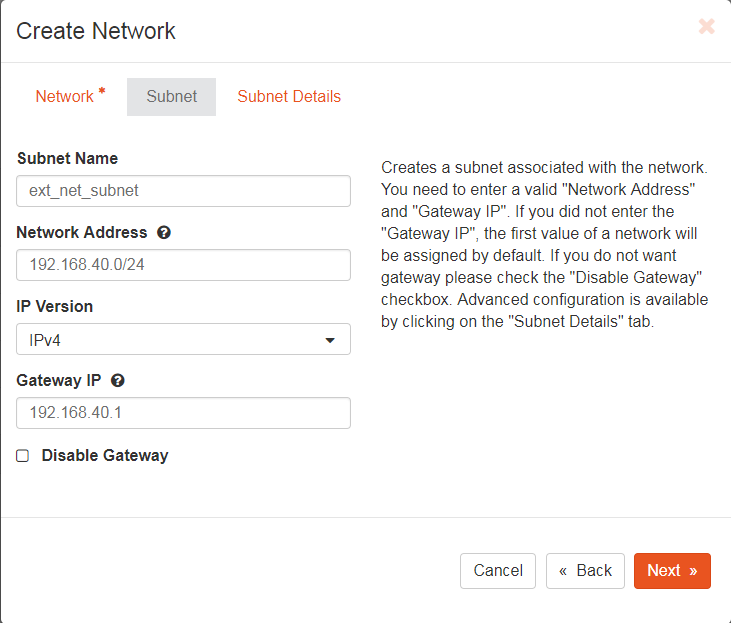
The second step is to create a subnet for the network using the various addresses from our MAAS and Juju configuration:
- Subnet Name: ext_net_subnet
- Network address (the network address where OpenStack is deployed): 192.168.40.0/24
- IP Version: IPv4
- Gateway IP: 192.168.40.1
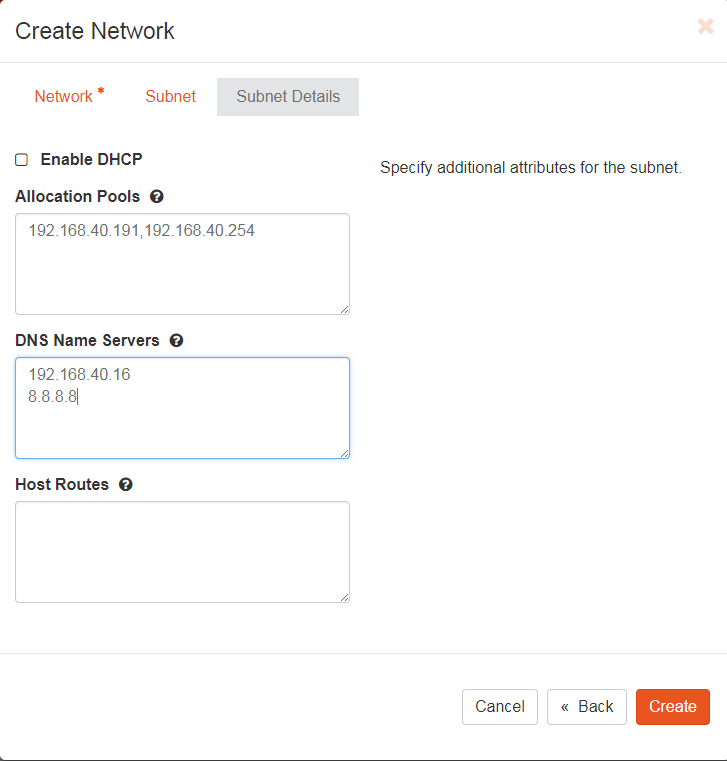
In the Subnet details tab it is important do unmark the Enable DHCP checkbox. An Allocation Pools should be defined (in format: start_IP_address, end_IP_address) as well as DNS Name Servers (on the first line: the IP address of the MAAS server, which in this case is 192.168.40.16 - see section “1.2. Installation”), on the second line: the DNS uset to resolve domains not managed by MAAS which in this case is 8.8.8.8 - see section “1.8. Network services”):
Define an external network using CLI:
To define a network called ext_net type the following command:
openstack network create ext_net --share --external
The output from this command will show the various fields and values for the chosen configuration option. To show the new network ID alongside its name type the command openstack network list:
+--------------------------------------+---------+---------+
| ID                                   | Name    | Subnets |
+--------------------------------------+---------+---------+
| fc171d22-d1b0-467d-b6fa-109dfb77787b | ext_net |         |
+--------------------------------------+---------+---------+
To create a subnet for the network using the various addresses from our MAAS and Juju configuration type the following command:
openstack subnet create ext_net_subnet --allocation-pool \
start=192.168.40.191,end=192.168.40.254 --subnet-range 192.168.40.0/24 \
--no-dhcp --gateway 192.168.40.1 --dns-nameserver 192.168.40.16 \
--dns-nameserver 8.8.8.8 --network ext_net
The output from the previous command provides a comprehensive overview of the new subnet’s configuration:
+-------------------------+--------------------------------------+
| Field                   | Value                                |
+-------------------------+--------------------------------------+
| allocation_pools        | 192.168.40.191-192.168.40.254        |
| cidr                    | 192.168.40.0/24                      |
| created_at              | 2019-01-04T13:43:48                  |
| description             |                                      |
| dns_nameservers         | 192.168.40.16, 8.8.8.8               |
| enable_dhcp             | False                                |
| gateway_ip              | 192.168.40.1                         |
| host_routes             |                                      |
| id                      | 563ecd06-bbc3-4c98-b93e              |
| ip_version              | 4                                    |
| ipv6_address_mode       | None                                 |
| ipv6_ra_mode            | None                                 |
| name                    | ext_net_subnet                       |
| network_id              | fc171d22-d1b0-467d-b6fa-109dfb77787b |
| project_id              | 4068710688184af997c1907137d67c76     |
| revision_number         | None                                 |
| segment_id              | None                                 |
| service_types           | None                                 |
| subnetpool_id           | None                                 |
| updated_at              | 2019-01-04T13:43:48                  |
| use_default_subnet_pool | None                                 |
+-------------------------+--------------------------------------+
Note
OpenStack has deprecated the use of the neutron command for network configuration, migrating most of its functionality into the Python OpenStack client. Version 2.4.0 or later of this client is needed for the subnet create command.
4.4. Cloud images
You need to download an Ubuntu image locally in order to be able to аdd it to a Glance. Canonical’s Ubuntu cloud images can be found here:
https://cloud-images.ubuntu.com
You could use wget to download the image of Ubuntu 18.04 LTS (Bionic):
wget https://cloud-images.ubuntu.com/bionic/current/bionic-server-cloudimg-amd64.img
To add this image to Glance use the following command:
openstack image create --public --min-disk 3 --container-format bare \
--disk-format qcow2 --property architecture=x86_64 \
--property hw_disk_bus=virtio --property hw_vif_model=virtio \
--file bionic-server-cloudimg-amd64.img \
"bionic x86_64"
Typing openstack image list you can make sure the image was successfully imported:
+--------------------------------------+---------------+--------+
| ID                                   | Name          | Status |
+--------------------------------------+---------------+--------+
| d4244007-5864-4a2d-9cfd-f008ade72df4 | bionic x86_64 | active |
+--------------------------------------+---------------+--------+
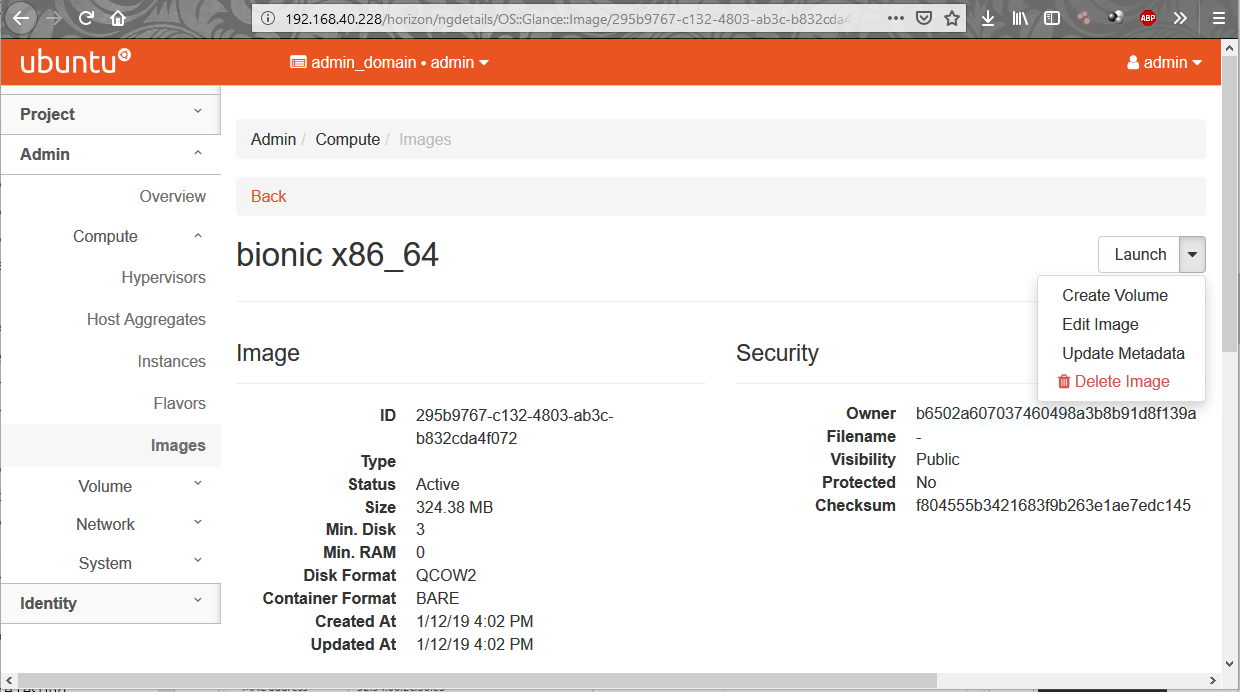
The Compute > Images page of OpenStack’s Horizon web UI lists many more details about imported images. In particular, note their size as this will limit the minimum root storage size of any OpenStack flavours used to deploy them.
4.5. Working with flavors
The flavors define the compute, memory, and storage capacity of nova computing instances. A flavor is an available hardware configuration for a server. It defines the size of a virtual server that can be launched.
Hint
For information on the flavors and flavor extra specs, refer to Flavors.
The following flavors should be created:
| Name | CPUs | RAM (MiB) | Root Disk (GiB) | Ephemeral Disk (GiB) |
| minimal | 1 | 3840 | 3 | 10 |
| small | 2 | 7680 | 3 | 14 |
| small-50GB-ephemeral-disk | 2 | 7680 | 3 | 50 |
| small-highmem | 4 | 31232 | 3 | 10 |
| small-highmem-100GB-ephemeral-disk | 4 | 31232 | 3 | 100 |
| m1.xlarge | 8 | 16384 | 160 | 0 |
Working with flavors using web UI:
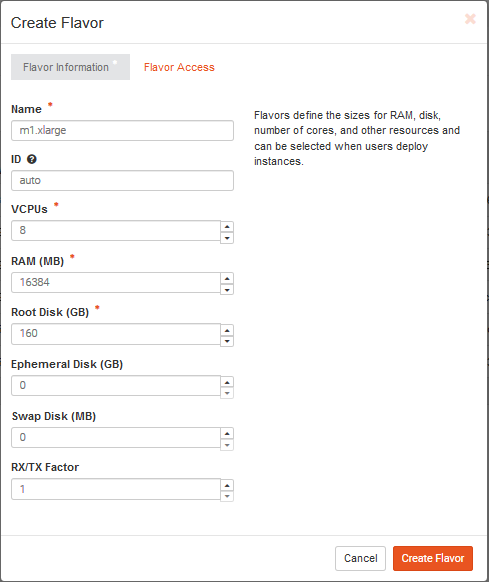
From the panel on the left, click on Admin and choose section Compute, subsection Flavors. Then press the button + Create Flavor.
After opening the Create Flavor window, you should enter the following settings (for m1.xlarge flavor, for example):
- Name: m1.xlarge
- ID: auto
- VCPUs: 8
- RAM (MB): 16384
- Root Disk (GB): 160
- Ephemeral Disk (GB): 0
- Swap Disk (MB): 0
- RX/TX Factor: 1
In the Flavor Access tab select the project where the created flavor will be used:
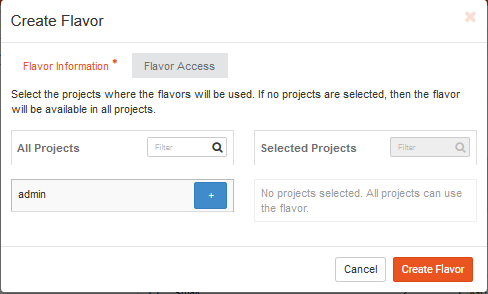
Note
If no projects are selected, then the flavor will be available in all projects.
Click the Create Flavor button to save changes.
Working with flavors using CLI:
Admin users can use the openstack flavor command to create, customize and manage flavor.
To create a flavor using an openstack flavor create command, you should specify the following parameters:
- flavour name
- ID
- RAM size
- disk size
- the number of vCPUs for the flavor
For the purpose of OpenStack configuration and CloudFoundry deployment, you need to create flavors with the following names and configuration:
openstack flavor create --vcpus 1 --ram 3840 --disk 3 --ephemeral 10 minimal
openstack flavor create --vcpus 2 --ram 7680 --disk 3 --ephemeral 14 small
openstack flavor create --vcpus 2 --ram 7680 --disk 3 --ephemeral 50 small-50GB-ephemeral-disk
openstack flavor create --vcpus 4 --ram 31232 --disk 3 --ephemeral 10 small-highmem
openstack flavor create --vcpus 4 --ram 31232 --disk 3 --ephemeral 100 small-highmem-100GB-ephemeral-disk
openstack flavor create --vcpus 8 --ram 16384 --disk 160 --ephemeral 0 m1.xlarge
To list the created flavors and show the ID and name, the amount of memory, the amount of disk space for the root partition and for the ephemeral partition, the swap, and the number of virtual CPUs for each flavor, type the command:
openstack flavor list
4.6. Working with domains, projects and users
The following is vital part of OpenStack operations:
- Domains - abstract resources; a domain is a collection of users and projects that exist within the OpenStack environment.
- Projects - organizational units in the cloud to which you can assign users (a project is a group of zero or more users).
- Users - members of one or more projects.
- Roles - define which actions users can perform. You assign roles to user-project pairs.
Working with domains and projects using web UI:
To create a domain using Dashboard, click on Identity from the panel on the left and choose section Domains. Then press the button + Create Domain:
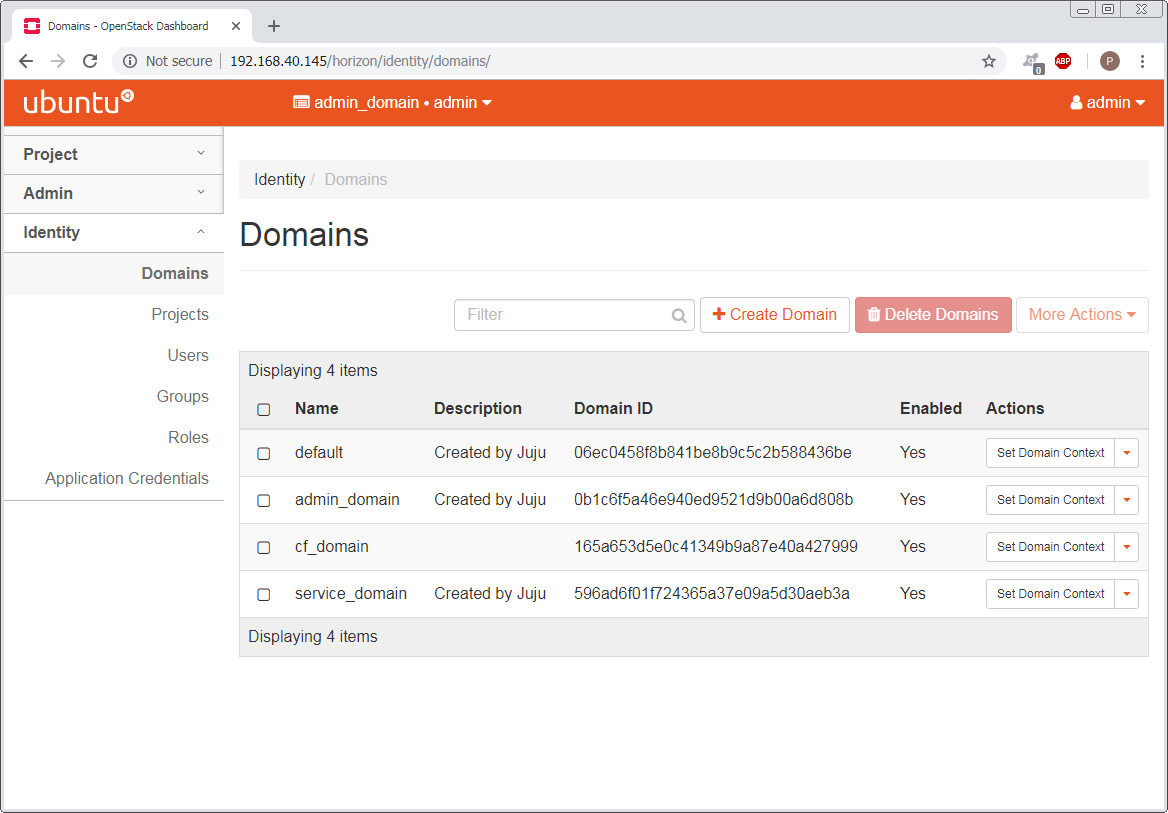
You need to create domain with name cf_domain.
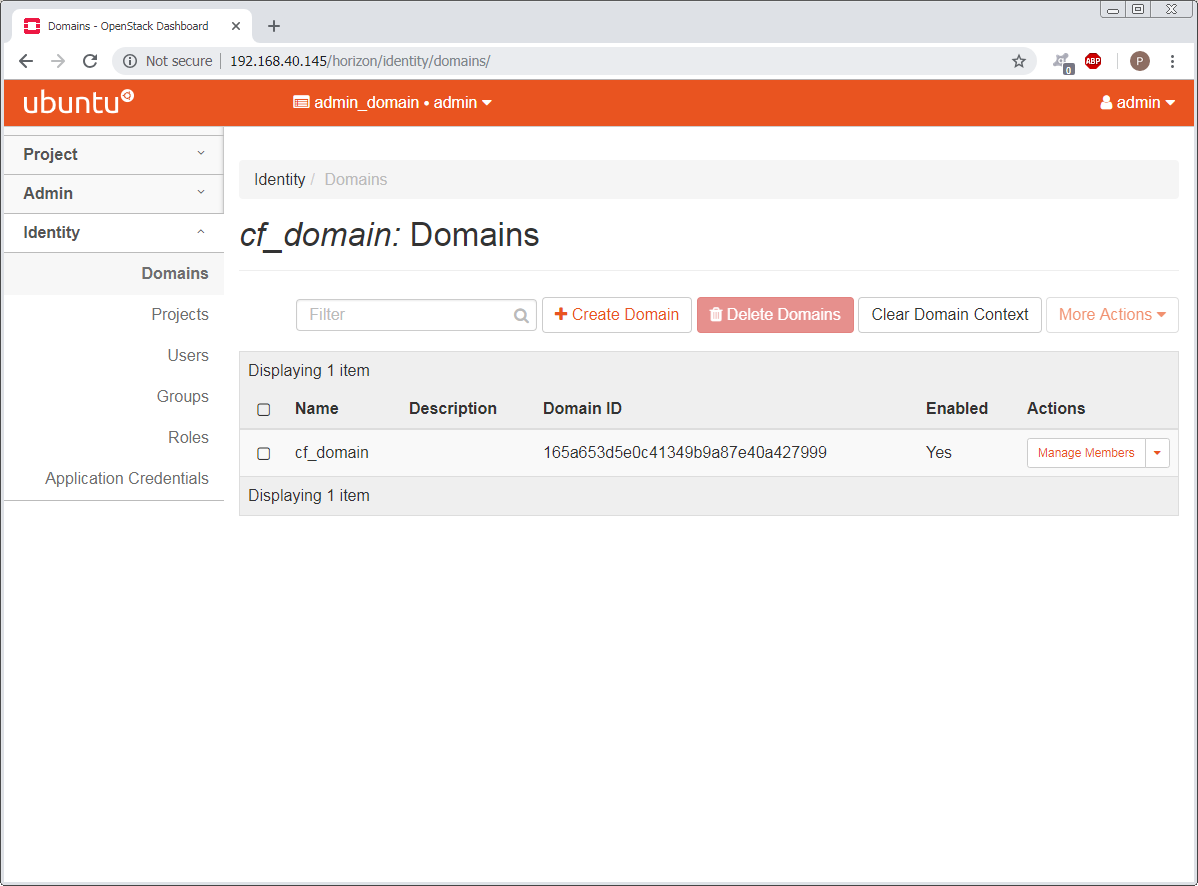
After the cf_domain is created you need to locate it in the table with domains and press the corresponding bitton Set Domain Context from the Actions column. In this way, all subsequent operations will be executed in the context of this domain.
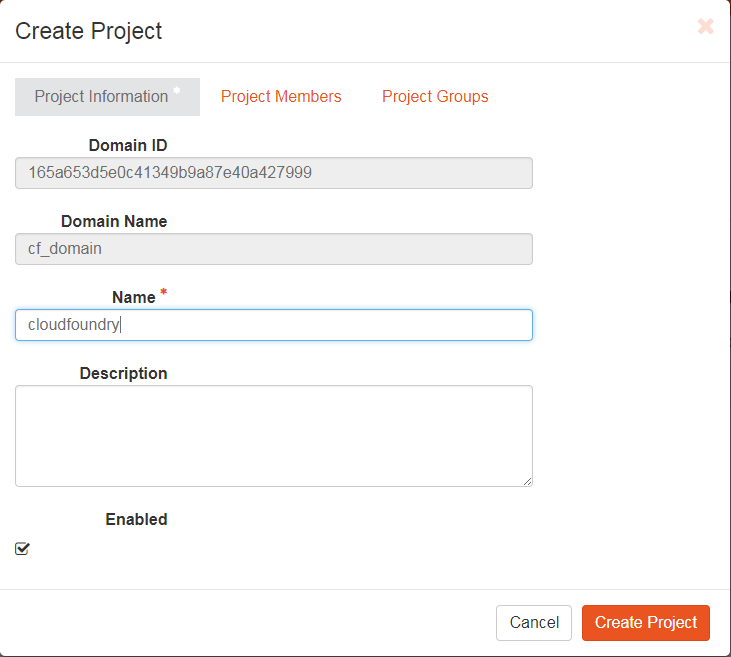
To create a Project in the context of cf_domain domain click on Identity from the panel on the left and choose section Projects. Then press the button + Create Project and enter the name cludfoundry for this new project:
To create a User with a role member of cludfoundry project, click on Identity from the panel on the left and choose section Users. Then press the button + Create User and enter the name eniware for the User Name:

You should specify a password your_password for this user.
After the project and user are created, you should go back into Identity / Domains section and press the button Clear Domain Context to complete the execution of procedures in the context of cf_domain:

The finall step is to log out user admin_domain from the Dashboard.
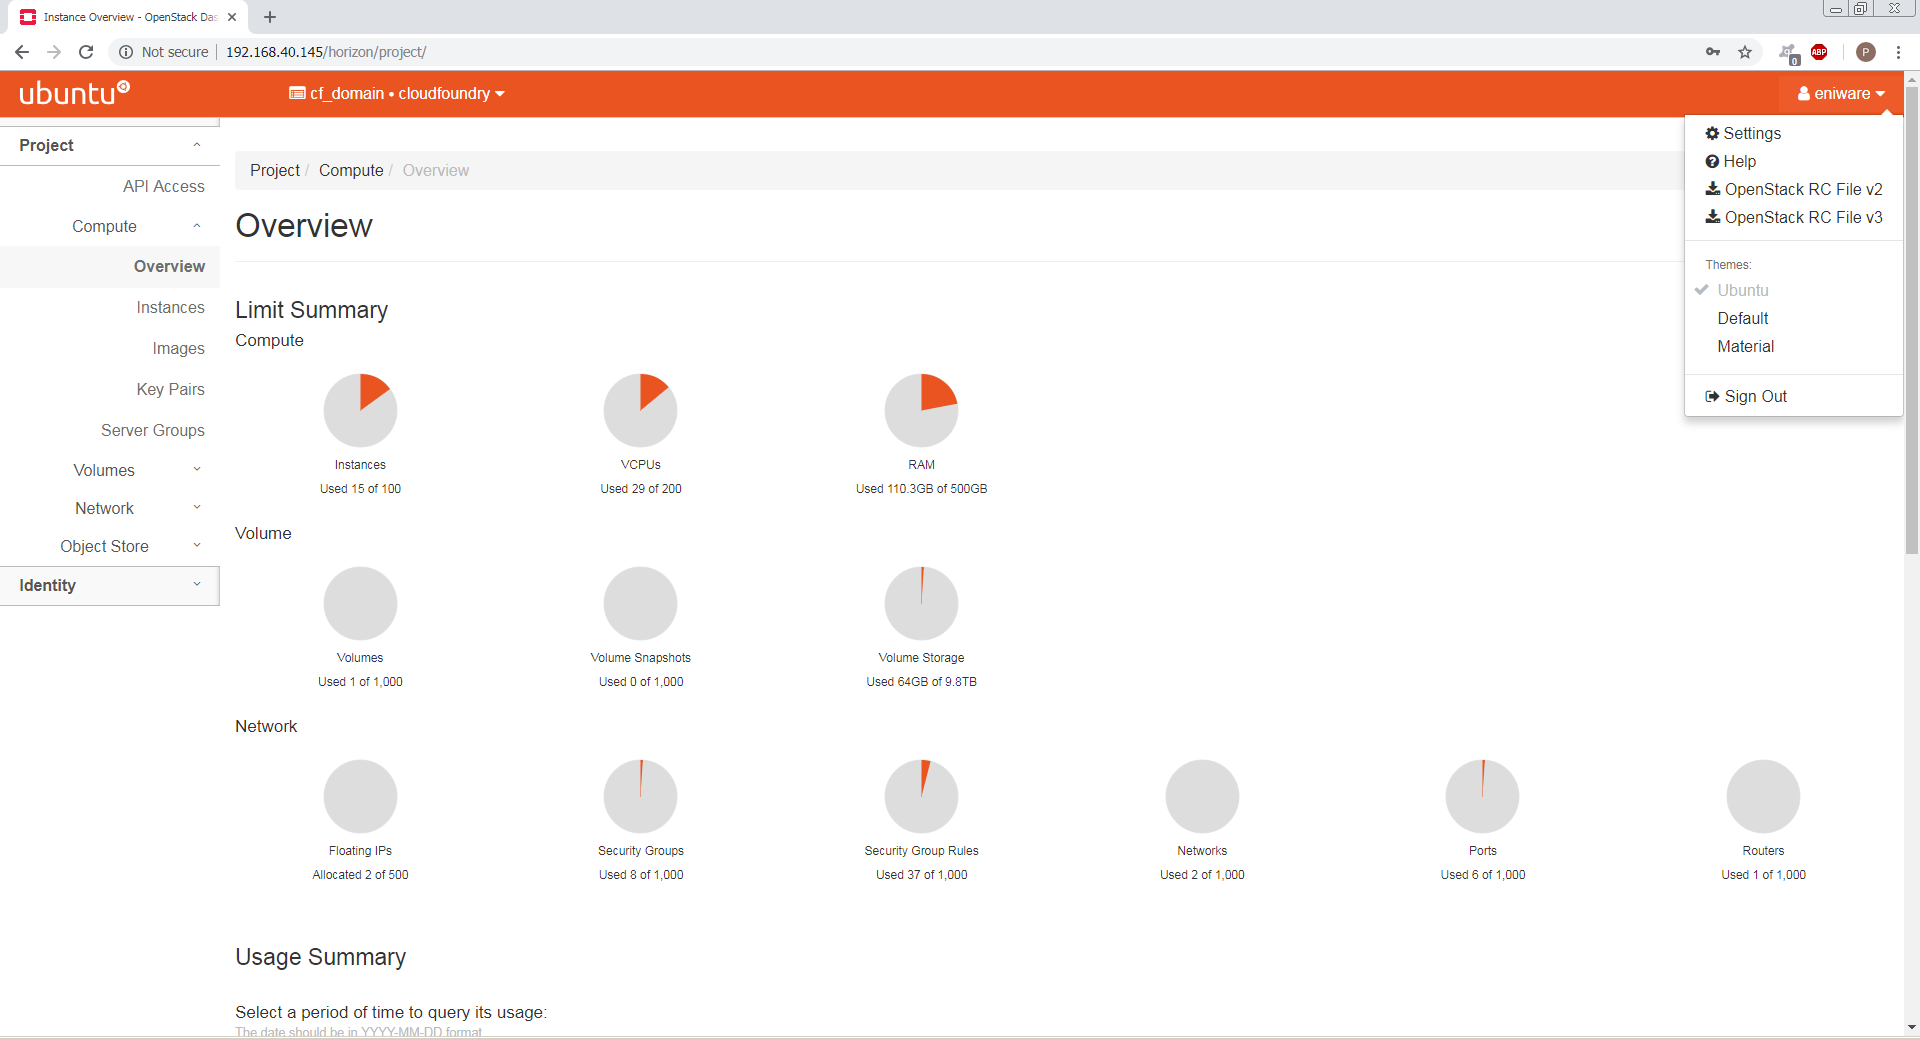
Now you can log in to Dashboard with the created domain cf_domain:
- Domain: cf_domain
- User: eniware
- Password: your_password
Working with domains and projects using CLI:
To create a single domain with a single project and single user for a new deployment, start with the domain:
openstack domain create cf_domain
To add a project cludfoundry to the domain cf_domain:
openstack project create cloudfoundry --domain cf_domain
To add a user eniware with a role member and assign that user to the project cloudfoundry within cf_domain:
openstack user create eniware --domain cf_domain --project cloudfoundry --password your_password
openstack role add --project cloudfoundry --project-domain cf_domain --user eniware --user-domain cf_domain Member
The output to the previous command will be similar to the following:
+---------------------+----------------------------------+
| Field               | Value                            |
+---------------------+----------------------------------+
| default_project_id  | 914e59223944433dbf12417ac4cd4031 |
| domain_id           | 7993528e51344814be2fd53f1f8f82f9 |
| enabled             | True                             |
| id                  | e980be28b20b4a2190c41ae478942ab1 |
| name                | cf_domain                        |
| options             | {}                               |
| password_expires_at | None                             |
+---------------------+----------------------------------+
Every subsequent action will now be performed by eniware user within the new cf_project project.
4.7. View and manage quotas
To prevent system capacities from being exhausted without notification, you can set up quotas. Quotas are operational limits. The Compute and Block Storage service quotas are described here.
View and manage quotas using web UI:
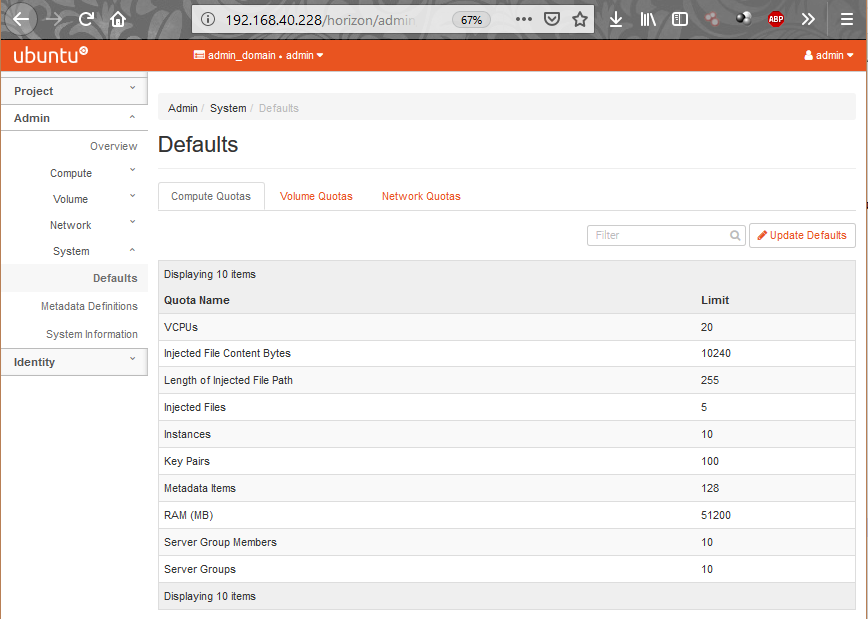
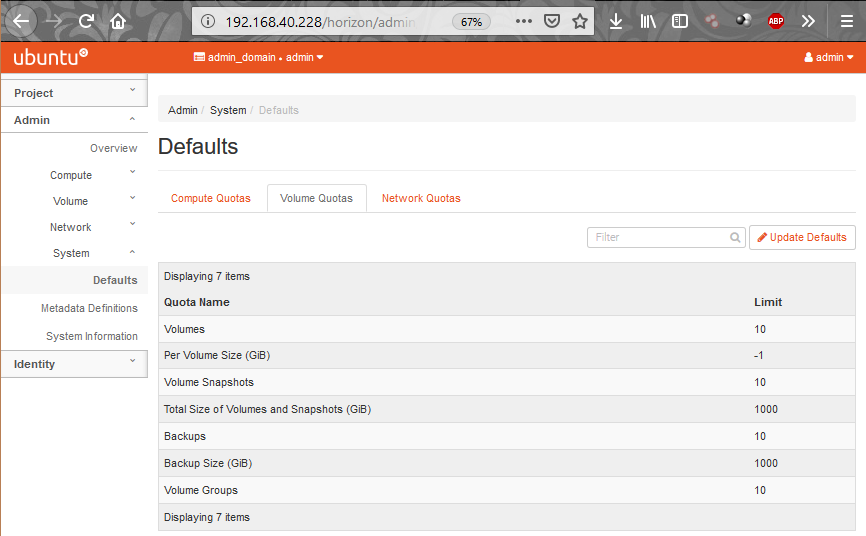
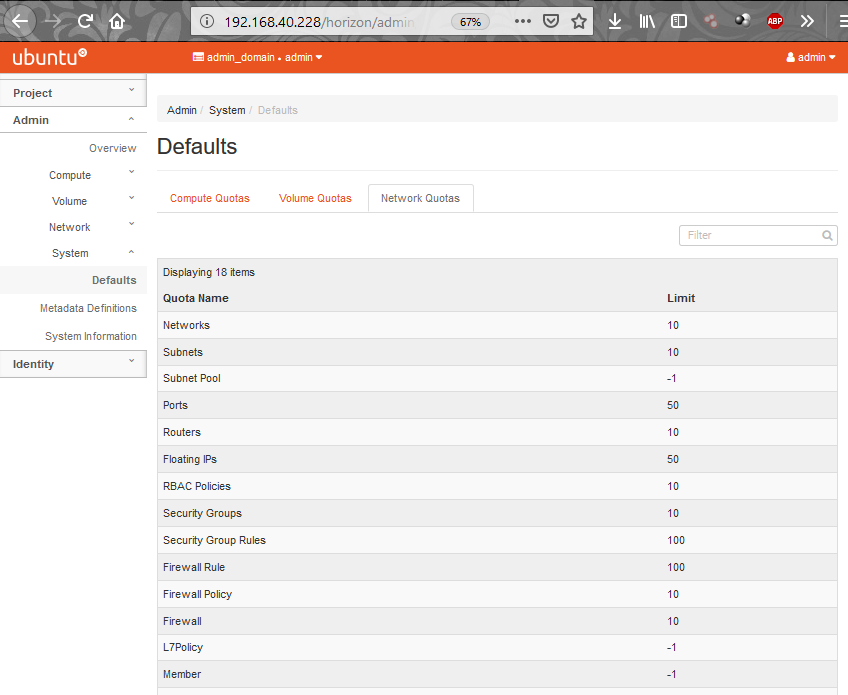
Log in to the Dashboard and select the admin project from the drop-down list. On the Admin tab, open the System tab and click the Defaults category. The default quota values are displayed:
- Compute Quotas:
- Volume Quotas:
- Network Quotas:
To update project quotas click the Update Defaults button. In the Update Default Quotas window, you can edit the default quota values. Click the Update Defaults button to save changes.
Note
Network quotas can not be edited in this way because they depend on the network settings that are configured
View and manage quotas using CLI:
The dashboard does not show all possible project quotas. To view and update the quotas for a service, you can use OpenStackClient CLI.
To list all default quotas for all projects use the following command:
openstack quota show --default
To list the currently set quota values for a cloudfondry project use the following command:
openstack quota show cloudfoundry
To update quota values for a given existing project:
openstack quota set --QUOTA_NAME QUOTA_VALUE PROJECT_OR_CLASS
To update quotas for cloudfoundry project use the following commands:
openstack quota set --instances 100 --cores 96 --ram 153600 --key-pairs 100 cloudfoundry
openstack quota set --volumes 100 --per-volume-gigabytes 500 --gigabytes 4096 cloudfoundry
openstack quota set --secgroup-rules 100 --secgroups 100 --networks 500 --subnets 1000 --ports 2000 --routers 1000 --vips 100 --subnetpools 500 cloudfoundry
- The first command will update the the OpenStack Compute service quota instances - number of instances or amount of CPU that a for cloudfoundry project can use.
- The second one wiil update the OpenStack Block Storage service quotas - volumes allowed for the project.
- The third command will update the the OpenStack Compute service quotas - security group rules allowed for the project.
4.8. Next steps
You have now successfully deployed and configured OpenStack, taking full advantage of both Juju and MAAS. The next step is to deploy CloudFoundry with BOSH Director on OpenStack.